7. Cloud Hosting#
7.1. Pre-Reading#
and
7.2. The Cloud#
The ☁️ is just you renting time on someone elses computer.
AWS, Azure, and Digital Ocean are all commercial cloud providers that will let you pay to rent their servers. These servers are in locations throughout the world! Organizations can also run their own private “cloud,” meaning servers that they directly control and manage.
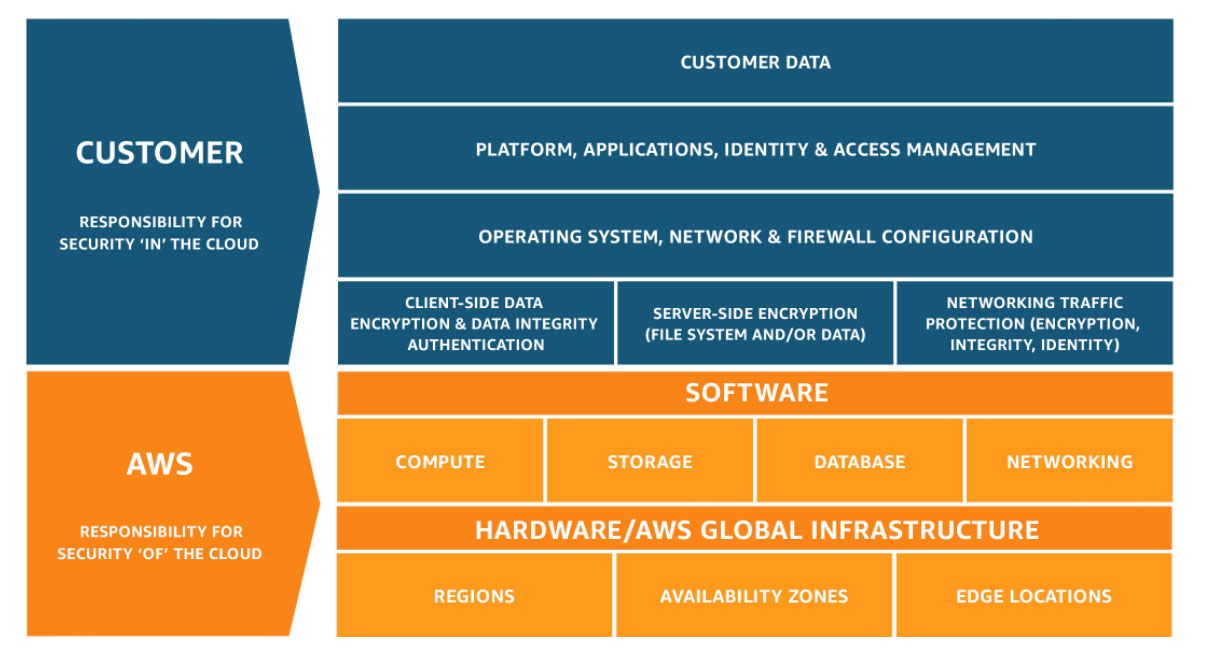
The Shared Responsibility Model is extremely helpful for understanding the cloud:

Fig. 7.1 The AWS Shared Responsibility Model details the divide between who secures the hardware and virtualization software “of” the cloud (AWS) vs. the applications running “in” the cloud (the customer).#
It is astonishing what cloud providers can serve you! But that depends…
On how well your manners are, and how big your pocketbook is. pic.twitter.com/rW1GyKhSpI
— Star Wars (@starwars) May 9, 2022
Cloud Resources#
This is a crazy complex space. You can get various certifications or complete free learning:
AWS Training and Certification
(AWS Certified Cloud Solutions Architect is the one to start with if you really want to get into this world.)
Note
This content is for educational purposes only. Nothing on this page constitutes an endorsement by the U.S. Government.
AWS is currently the world leader, with Microsoft Azure and Google Cloud Provider (GCP) nipping at its heals.
DigitalOcean is smaller, but more user friendly (but also less capable) and oftentimes more affordable. They also offer $200 free credit via GitHub Student.
Virtual Machines#
You can have your very own virtual machine through AWS EC2 or DigitalOcean Droplets.
As of October 2024, here is the cheapest DO Droplet:
Memory |
vCPU |
Transfer |
SSD |
$/hr |
$/mo |
|---|---|---|---|---|---|
512 MiB |
1 vCPU |
500 GiB |
10 GiB |
$0.00595 |
$4.00 |
Cloud VMs are highly configurable, but a good default start is the latest LTS release of Ubuntu.
You can also pick a geographic region to deploy the VM to. The location of a data center will impact latency, price, and legal considerations.
Object Storage#
AWS Simple Scalable Storage (S3) is the de facto standard for object storage. It is object storage, meaning you have to store/fetch/delete entire files, rather than parts of a file (changing parts of a file is block storage).
S3 is great for serving static webpages and files, off-site backups, or massive datalakes!
It has a generous free tier, then $0.023 per GB per month after that for storage. But watch out, because the data transfer out can get pricy for large applications.
Security#
To be extremely brief:
Identity and Access Management (IAM) is tricky. provides fine granularity of what people and programs can and cannot read/modify/delete but because it can be tricky to get these permissions correct, organizations often over-allocate permissions. Hackers love to take advantage of that.
“Secure” is rarely the default. (According to the shared responsibility model, that’s your job!). For example, although S3 is now encrypted by default, it took years and several high-profile breeches for this to be the case!
Managed Services Cost Money. If you want things like automatic updates, automatic logging, and more, the cloud provide can do that for you - this will help your security posture - but it cost more cash.
7.3. Web Application Architecture#
Web applications are frequently described in terms of “front end” and “back end.” In this class we are exclusively concerned with the back end.
The front end is the pretty website that you see. It is a collection of HTML, CSS, and JavaScript. Your web browser executes and renders the front end code.
The back end is the part most people never see: the logic and databases that drive the application. This can be written in Go, Python, Rust, Kotlin, or many other languages.

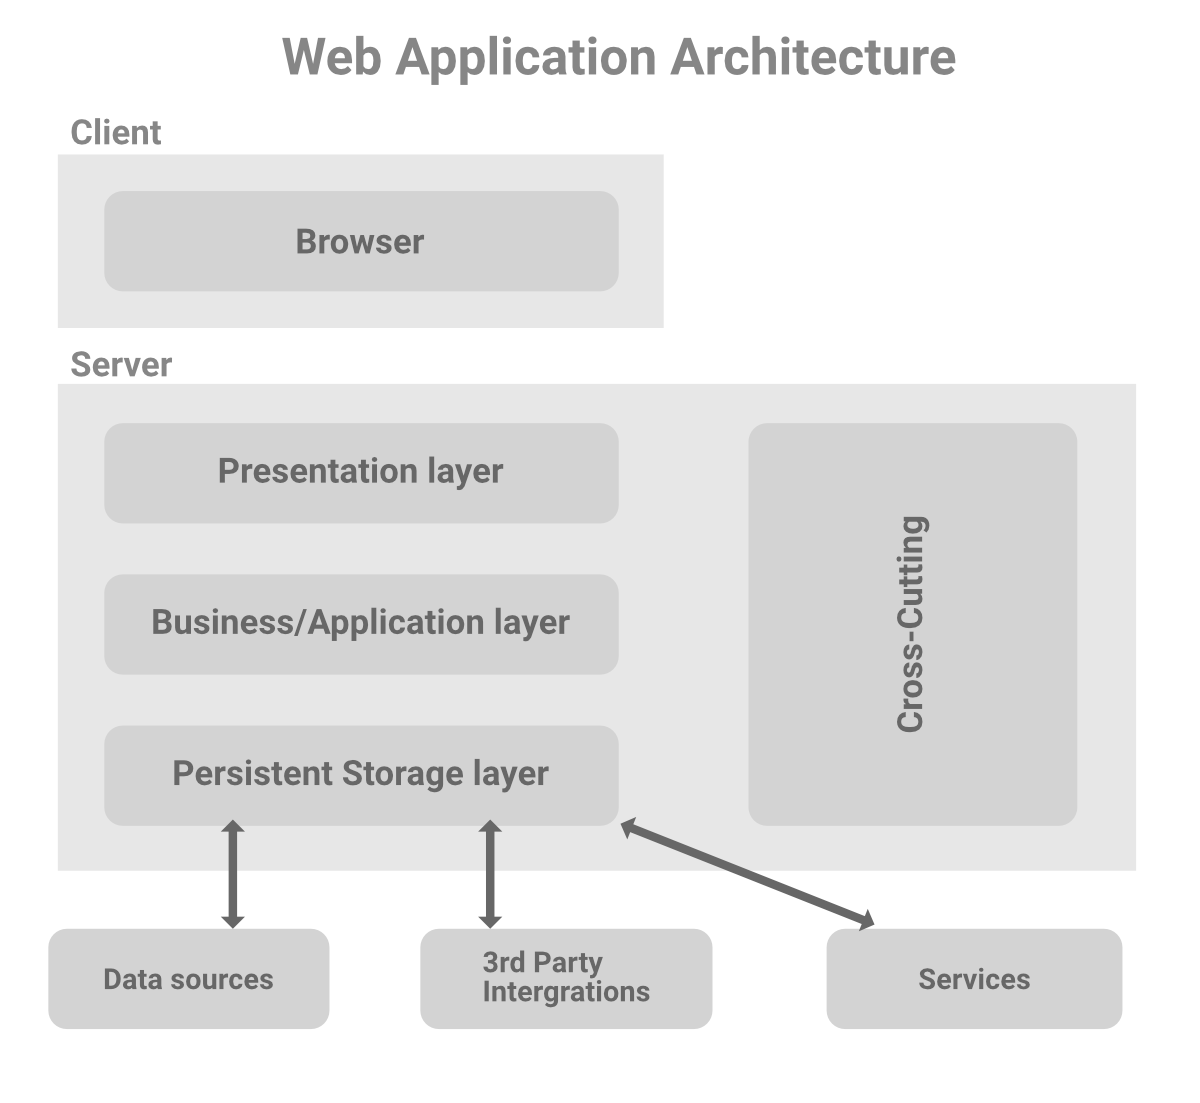
Fig. 7.2 The common Web Application Three Tier Architecture. See GeeksForGeeks: Web Applications for Beginners for more information.#
Databases are beyond the scope of this course. As a result, the apps we build will be stateless. They will focus on providing inference via a pre-trained model.
APIs#
Application Program Interfaces (APIs) are a programmatic way to interact with a web application.
There are many types, but we will use HTTP RESTful APIs in this course.
Representational State Transfer (REST) is a software architecture that imposes conditions on how an API should work. These APIs are stateless, meaning each request contains authentication tokens and other information and is isolated from other requests. This is in contrast to keeping a long-lived connection open.
Our APIs will primarily be HTTP GET requests - which get information from the server - or POST requests - which submit data to be processed.
As an example GET request, you can fetch your username from GitHub!
Use the curl command (which makes a GET request by default):
# Replace octocat with your GitHub username
curl https://api.github.com/users/octocat
FastAPI#
A popular Python API Framework is FastAPI. Two big reasons to use it:
The documentation is a pleasure to read
It supports type annotations in path parameters and return types
FastAPI will use this return type to:
Validate the returned data.
If the data is invalid (e.g. you are missing a field), it means that your app code is broken, not returning what it should, and it will return a server error instead of returning incorrect data. This way you and your clients can be certain that they will receive the data and the data shape expected.
Add a JSON Schema for the response, in the OpenAPI path operation.
This will be used by the automatic docs.
It will also be used by automatic client code generation tools.
But most importantly:
It will limit and filter the output data to what is defined in the return type.
This is particularly important for security
7.4. Next Steps: FastAPI Demo#
First, log on to your Raspberry Pi. Open two terminals.
Terminal 1#
Open a fresh terminal. Print your current working directory.
Make a folder for this lab:
mkdir fastapi-demo
cd fastapi-demo
Create python script#
Next we will create the python file.
Run the command
vim hello.py
Vim is a ubiquitous text editor in linux systems. Enter insert mode by pressing the i key.
Then paste in this code:
from fastapi import FastAPI

app = FastAPI()

@app.get("/")
def read_root():
    return {"Hello": "World"}
Figure out how to exit Vim.
Once you exit the file, you can make sure you saved it properly with
cat hello.py
Setup Virtual Environment#
We want to isolate our Python dependencies for this project from the system Python dependencies (or very bad things will happen).
Create a Python virtual environment.
python3 -m venv .venv
Activate the virtual environment
source .venv/bin/activate
Verify that you are using the venv.
You should also see .venv ahead of your bash prompt.
# Should output ~/.venv/bin/pyhton NOT /usr/bin/python
which python
Note
You can use deactivate to exit the venv.
Danger
You must restart a virtual environment every time you open a new terminal.
If you forget to this and start installing things with pip prior to running source you might break your system.
If you forget to activate and start trying to run scripts they will fail because of missing modules.
Pay attention to where you are in your terminal!
Run the script#
Now that we are inside our venv (you are, right???) install FastAPI.
pip install fastapi[standard]
Check out the docs
fastapi --help
This shows both dev and run. Look at dev
fastapi dev --help
This says
Usage: fastapi dev [OPTIONS] [PATH]
Run a FastAPI app in development mode. 🧪
This is equivalent to fastapi run but with reload enabled and listening on the 127.0.0.1 address.
Ok! So that’s what we want. Just keep in mind that you won’t be able to communicate with your app from external devices because it’s only listening on loopback.
Run the script
fastapi dev hello.py
This will output useful info. Take note of the port it’s serving.
Terminal 2#
Time to hit the API!
Open a second terminal alongside the first, then run:
# Replace xxxx with the port number you are serving the app on
curl 127.0.0.1:xxxx
You should see a glorious {“Hello”: “World”} returned! Yes, that’s JSON being returned. JSON is a standard way of representing text data, and you’ll need to learn to work with it a bit.
Back in Terminal 1, you should also see a “GET” request from yourself that was answered with a “200 OK” status code.
You don’t need to go in-depth on HTTP response status codes, but
100s for info
200s for success
300s for redirect
400s for client error
500s for server error
So a “404 Not Found” error is your fault, as the client, because you requested something that doesn’t exist!
