22. Containerization#
22.1. Pre-reading#
Objectives#
Describe the difficulties with dependency management
Explain what a container is and how it is different from a virtual machine
Demonstrate how to build an image from
Dockerfileand run the image as a container.
22.2. The Problem#
Managing dependencies is extremely challenging for complex projects. Different languages have various approaches for managing dependencies (with varying degrees of success.) For example:
Python uses Poetry or virtual environments (like
.venv/)Go has a builtin go.mod file
Make has been a longstanding, general-purpose GNU solution
But the challenge is even greater when you have specific builds trying to take advantage of hardware or packaging multiple dependencies together… and that’s just for one app!
The problem is even worse when trying to deploy an entire stack, with a web frontend, a database, a proxy, and more and more!
22.3. Containers#
A container is an isolated, lightweight silo for running an application on the host operating system. ~ Microsoft Learn
Virtual machines run a complete operating system – including its own kernel – on top of a hypervisor, such as VMware or Hyper-V.

Containers build on top of the host operating system’s kernel and are managed by a container runtime, such as Docker or Podman.

Both virtual machines and containers offer benefits with isolation and portability,however there are some key differences.
Most relevant here:
Images are immutable, so if you run an image it will create a container but any changes to that container will not impact the image.
Containers are ephemeral, so after you kill a container none of the changes you made will be saved.
Images are intended to serve a single function; typically, that means running a single process and
You orchestrate multiple containers to deploy a multi-tiered and scalable application.
Docker#
Docker has completely revolutionized the way the world operates software applications.
Docker Inc. is an American company that offers products such as Docker Hub and Docker Desktop.
Docker Hub is a container registry (
docker.io). There are thousands of community and officially sponsored images; you can also upload your own images.NVIDIA NGC Catalog is a container registry (
nvcr.io) for CUDA GPU accelerated containers.Docker Engine** is an open source project for running containers. It is part of the Moby Project, which is an open source upstream of Docker Enterprise Edition.
Podman is an Open Container Runtime that is a great alternative to Docker and is easily installed with apt, but doesn’t have as good of GPU support.
Here is how you might adapt Lab 1: Recognizing Handwritten Digits via TensorFlow and FastAPI to be deployed with containers.
        flowchart LR
    subgraph Client
        C[Client]
    end

    subgraph Docker Environment
        subgraph Fc[FastAPI Container]
            Fa[FastAPI Application]
        end

        subgraph Tc[TensorFlow Container]
            Tm[TensorFlow Model]
        end
    end

    C -->|HTTP Requests| Fa
    Fa -->|REST API Calls| Tm
    Tm -->|Predictions| Fa
    Fa -->|HTTP Response| C
Docker Engine#
Docker Engine is an open source containerization technology for building and containerizing your applications. Docker Engine acts as a client-server application with:
A server with a long-running daemon process
dockerd.APIs which specify interfaces that programs can use to talk to and instruct the Docker daemon.
A command line interface (CLI) client
docker.The CLI uses Docker APIs to control or interact with the Docker daemon through scripting or direct CLI commands. Many other Docker applications use the underlying API and CLI. The daemon creates and manage Docker objects, such as images, containers, networks, and volumes.
You will largely interact with docker via the CLI.
As an example, try
sudo docker run -it --rm alpine:latest
This will do a few things!
Pull the latest tag from docker.io/alpine.
Save the image locally.
Run the container (you need to familiarize yourself with the flags for this subcommand).
-ispecifies interactive and keeps STDIN open-tallocates a pseudo-TTY so you get things like autocompletion--rmautomatically removes the container when it exits
Enters you into the default process for the alpine container:
/bin/sh.
Now, inside the alpine container, run
cat /etc/os/release
Next, open a new terminal and run
sudo docker ps
Type exit back in your alpine terminal and run docker ps again.
Now try docker ps -a.
Container Lifecycle#
A core benefit of containerization is that immutable images can be pre-built and then distributed via container repositories. This means that complex installations just work!
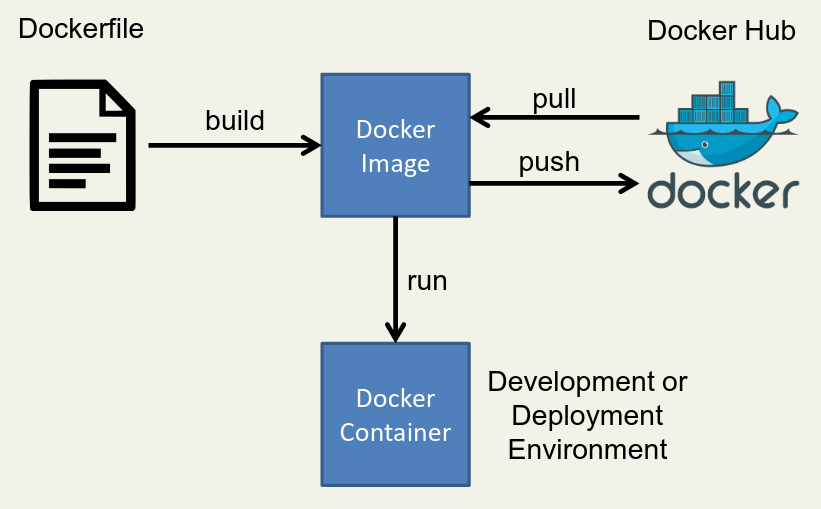
Fig. 22.1 The container lifecycle includes being built, pulled, pushed, run, and more.#
Container Registry#
A container registry just hosts built containers. The two we will use for this course are DockerHub and NVIDIA NCG Catalog. These are a little bit like Git repositories except instead of hosting code, they host images ready to run code.
You can pull an image:
sudo docker pull docker.io/python:latest
You can see what images you have locally:
sudo docker image ls
You can push an image as well:
docker image push docker.io/example/my-cool-container:latest
22.4. Dockerfile#
What if you want to customize your container?
Remember images are immutable and containers ephemeral, so you generally you don’t modify them while running.
Instead, you build your own custom image! This is accomplished through a file named Dockerfile.
General flow:
Create a
DockerfileEdit
DockerfileBuild image based on
Dockerfilewithdocker buildx(Optionally) push your newly created image to a container registry
Run the image as a container
Dockerfile Example#
Make a new directory and in that directory create a file named Dockerfile
Put this into the Dockerfile
# Example to print your public IP address
FROM alpine:3

RUN apk add curl

ENTRYPOINT ["/usr/bin/curl", "-s", "ifconfig.me"]
Build the image
# -t specifies the name we want to give the tag
sudo docker buildx build -t mypub-ip .
Tip
By default, build looks at all the files in a directory
(that’s why the . is important!)
To minimize file size, put your Dockerfile in a directory that only has what you need.
See that your image is now available
sudo docker image ls
Run the container
sudo docker run --rm mypub-ip
(Optional/hypothetical) Push your new image to Dockerhub
sudo docker push docker.io/your-username/mypub-ip:latest
(Optional/hypothetical) Pull your image to run as a container on a different computer!
# Notice that you don't need the Dockerfile anymore!
sudo docker pull docker.io/your-username/alpine-publicip:latest
22.5. Ultralytics YOLO#
Note
The instructor should demo this! It’s easy, but the image is large and takes time to pull.
Ultralytics publishes a Docker image that lets you run YOLO (You Only Look Once) object detection on your Jetson Orin Nano!
Quick Start Guide: NVIDIA Jetson with Ultralytics YOLO11
docker pull ultralytics/ultralytics:latest-jetson-jetpack6
Plug in a webcam, run this, and then click on the link it provides to open a browser!
docker run -it --rm --device=/dev/video0 --runtime=nvidia --ipc=host ultralytics/ultralytics:latest-jetson-jetpack6 yolo streamlist-predict