BCE 0: Get started with Git#
This is a “Before Class Exercise.” You can wait to complete it with one of the labs or In Class Exercises, but doing this early will save you time later.
Using proper version control techniques is an expectation for this course, and you should expect yourself to use it for all of your courses that involve writing code.
Also see GitHub real fast in the appendix.
Overview#
This exercise will get you ready to use Git for version control of your projects. It will prepare you to use GitHub to remotely store your code.
GitHub is the most popular site for hosting open source code. It also allows for hosting private code. The fact that we are using it is not an endorsement by USAFA or USG.
Note that there are other options. For example:
GitLab has fantastic integrated DevOps and project management. It is often the best choice for self-hosted options.
Bitbucket integrates well with the rest of the Atlassian suite.
Git is software that allows for distributed version control between multiple collaborators.
Create GitHub account#
Use a personal email to create account on GitHub. The account name should be professional, can include part or all of your real name, but can also be a screen name. Keep in mind it will be public and GitHub functions as sort of a social media for developers. If you already have a GitHub account, you can use that account.
Check the box “Keep my email address private” and copy the generated
@users.noreply.github.comemail for later use.Check the box “Block command line pushes that expose my email.”
Optional#
Go to email settings and add and verify your USAFA email.
Get student benefits for your account.
Git#
Git is software that allows for distributed version control between multiple collaborators. It was created to manage development of the Linux kernel, but is now the most widely-used version control system in the world.
Note
If you are going to use software to do anything useful for the Air Force or Space Force, you need to know how to use Git.
Git Flow with large teams can be a little overwhelming at first, but for this course you need to understand that:
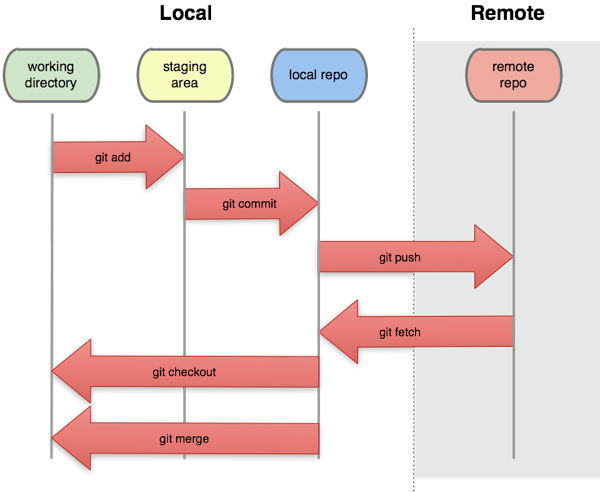
You have a git repository that your code lives in.
You make local changes to your code.
You stage those changes to be committed.
You commit those changes.
You push those changes to the remote repository (in our case, GitHub.com).
Others can view those changes on the remote repository.
Directly pushing works fine if you are the only collaborator, but as soon as there is a second person contributing to the same code, you must use branches to avoid conflicts.
Install Git#
If you haven’t already for CS 210 or some other class, install Git Bash for Windows.
Default options usually work pretty well, but:
Select Components: use defaults, but make sure “Add a Git Bash Profile to Windows Terminal” is checked
Choosing the default editor: Use Vim if you like computers and cyber, use Nano otherwise.
Initial branch names: the tide is going to use “main” instead of “master”, but up to you.
Git from the command line and also from 3rd-party software
Use external OpenSSH, since it comes with PowerShell
Use native Windows Secure Channel library
Checkout Windows-style, commit Unix-style line endings
Git Crededntial Manager
Configure git#
Open up Git Bash. It basically pretends to be a stripped-down Linux.
We have to tell our local git environment who we are. Use your GitHub username and the noreply email you found when you setup GitHub
git config --global user.name <github user name>
git config --global user.email "<github noreply email>@users.noreply.github.com"
Install an IDE (optional)#
An integrated development environment (IDE) is software for building applications that combines common developer tools into a single graphical user interface (GUI).
Notepad++ is simple and allows for opening a wide variety of file types.
VS Code is an incredible IDE and can be installed from the microsoft store or downloaded.
You can pick either one, or both.