✏️ HW 3 Memory#
📌 Objectives#
Students should be able to find the address of the next instruction using the Program Counter (PC) register.
Students should be able to identify the location of data in the Data Memory (RAM), the Instruction Memory (ROM), and the Stack.
Note
The debugger is a programmer’s best friend! Be very familiar with the debugger. It is the key to success in programming courses.
💻 Procedure#
Setup#
Connect the LaunchPad to your computer via the provided USB cable.
Open Code Composer Studio (CCS) and select your workspace if prompted.
Ensure your
Project Exploreris open on the left of the CCS screen. If not, select View > Project Explorer.
Build and debug Example01_StringLength project.#
Open the
Example01_StringLengthproject by double-clicking it in theProject Explorer. When the project is successfully selected, it will be marked as [Active - Debug].Build your code and initiate the debugger.
As you navigate through
strlen.asm, read each comment very carefully to fully comprehend the purpose of every line.Make sure the
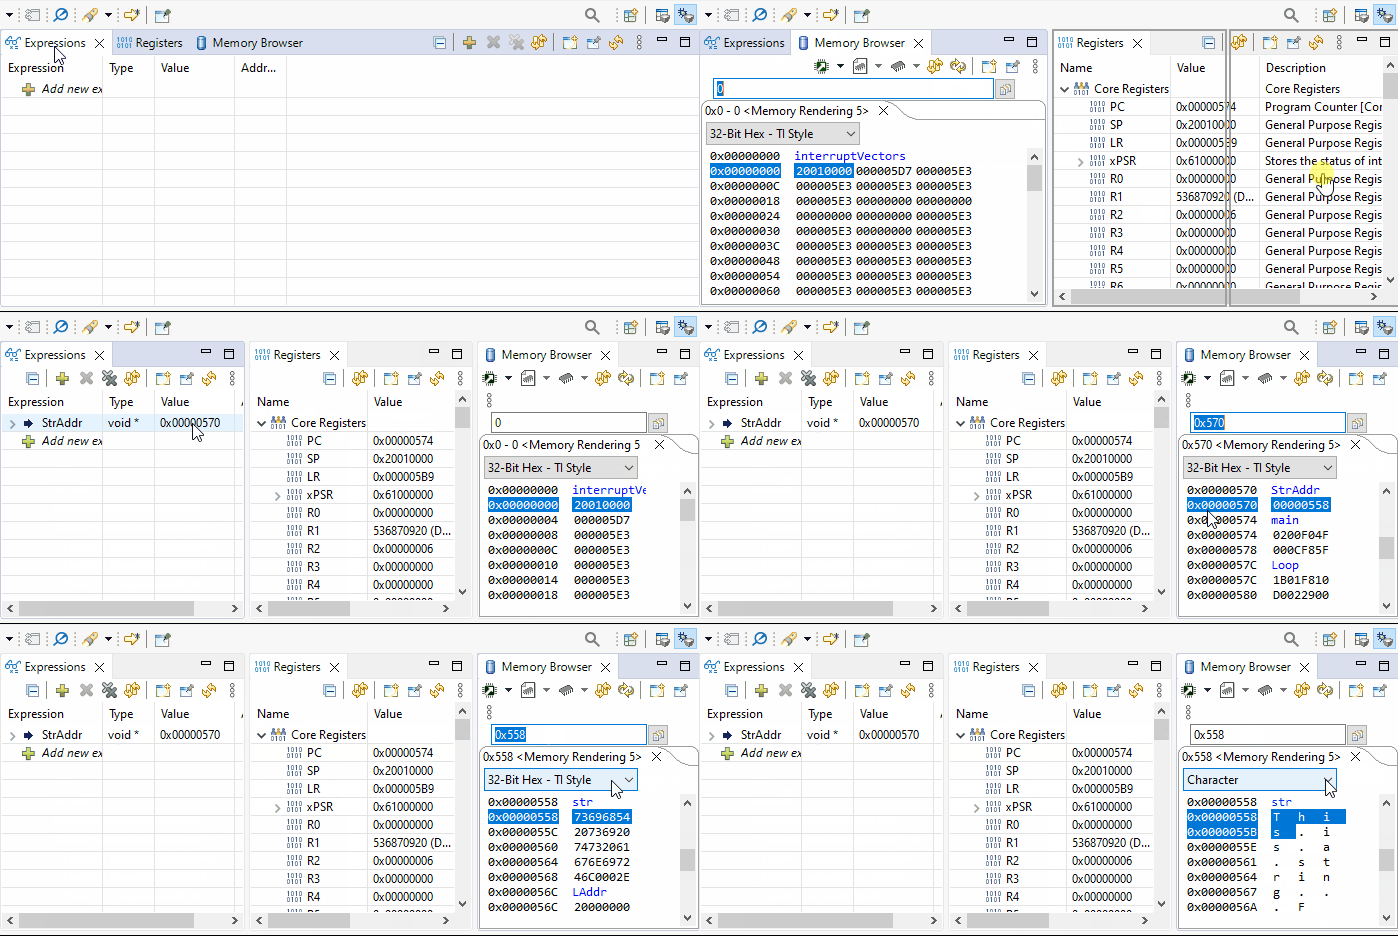
Expressions,Registers, andMemory Browsertabs are visible. It might be helpful to arrange them side by side, as illustrated in the GIF animation below.

Note
In the debug mode, the assembly code highlighted (with the blue arrow next to the line number) is the next instruction to execute. The instruction has NOT been executed yet!
Before executing
MOV R2, #0at line 66, add a new expression StrAddr in theExpressionstab. In theValuecolumn, you can find a value (e.g., 0x00000570), which represents the location (address) of StrAddr, not its actual content.To find the actual content, input the address (e.g., 0x570) into the
Memory Browser. This will display the value stored at StrAddr (e.g., 0x00000514), which corresponds to the address of the first character in str. Make sure the encoding style (number format) is set to32-Bit Hexto easily read the address value.In the
Memory Browser, type in the hexadecimal value (e.g., 0x514) to view the characters of str.Change the encoding style (number format) to
Characterto read the string value more easily. You should then see the string, “This is a string.”Keep in mind that
StrAddrholds the address of the first character, ‘T’, instr. The equivalent syntax in C could be represented as:
// The following lines are equivalent.
char* StrAddr = "This is a string.";
// or
char StrAddr[] = "This is a string.";   // 17 characters but the array size will be 18.
// or
char StrAddr[18] = "This is a string.";  // The array must include the space for \0'.
A string constant like
StrAddris stored as an array of characters containing the characters of the string and terminated with a ‘\0’ (null character, first character of the ASCII Table) to mark the end of the string as shown below.
        {'T','h','i','s',' ','i','s',' ','a',' ','s','t','r','i','n','g','\0'}
          ^
StrAddr   |
 +---+    |
 |  -|-----
 +---+
Important
It is inaccurate to say that StrAddr is the address of the entire string. In fact, StrAddr corresponds to the address of the initial character, ‘I’. Following this pattern, StrAddr+1 designates the address of the second character, while StrAddr+N signifies the address of the \((N+1)\)-th character within the string. To access the \((N+1)\)-th character, you can use either *(StrAddr+N) or StrAddr[N].
After executing
LDR R0, StrAddrat line 67, examine R0. It should be 0x00000558, which is the value ofStrAddr. This value agrees with the value we found in theMemory Broswer.Execute
LDRB R1, [R0], #1at line 68 and examine R0 and R1. You will find R0 has been incremented to 0x00000559. You will also find R1 hold the value, 0x54 (84\(_{10}\)) at 0x00000558. It is the ASCII value for ‘T’.Put a breakpoint at line 75,
STR R2, [R0]and clickResume(or F8). It will stop at line 75. We have executed line 74,LDR R0, LAddr. You can find R0 holds 0x20000000, which is the address oflength. Since we putlengthunder.data, the assembler has reserved a space forlengthin the Data Memory block.Click
Resume(or F8) followed bySuspend (Alt-F8). It will stay atStall B Stallat line 77.Examine the value at 0x20000000 in memory. Change the number format to
32-Bit Signed Int. Did you find the length of the string stored in memory?
Build and debug Ex02_Addressing project.#
Open the
Ex02_Addressingproject by double-clicking it in theProject Explorer. The currently selected project will have [Active - Debug] next to it.Build your code and run the debugger.
Ensure the
Expression,Registers, andMemory Browsertabs are visible.As you carefully step through the code line by line, examine the R0 through R8 registers to learn how the
LDRandLDRBinstructions work. Note that you will be asked to find the values of registers in GR1 but you are not permitted to use CCS.
Build and debug HW03_MemoryAccess project.#
Open the
HW03_MemoryAccessproject by double-clicking it inProject Explorer. The project currently selected will list [Active - Debug] next to it.Build your code and run the debugger.
Ensure the
Expression,Registers, andMemory Browsertabs are visible.As you step through the code, CAREFULLY READ EVERY COMMENT TO ENSURE WHAT EACH LINE IS DOING!
Step through the program to answer the questions on Gradescope.
Important
A solid understanding of memory access and pointers hold significant importance in the realm of computer programming. If you’ve ever believed that certain programming languages like Python, Java, or C# render pointers unnecessary, you’re mistaken - BIG mistake. I encourage you to read this.
🚚 Deliverables#
Step through HW03_Memory.asm to answer the questions on Gradescope.
